No matter how much you want to, you cannot seem to escape the reality of carrying your keys everywhere – even when they turn out to be a mess. Using these key assembly tips, it might present a solution to the issue.
It is said that the advancement of age brings greater experience and wisdom, but also the increase of the number of keys you carry. While they have aided in the security and safety of our belongings, they can quickly become a nuisance – which makes many resort to using key organizers.
However, some are more challenging to assemble than others, although the general assembly format is the same.In this article, we look at various tips you can use when assembling this tool, and make your work easier in the long term.
Why enquire about assembly?
When it comes to key organizers, it is easy to make them work them from a general standpoint. Key organizers have the advantage ofremaining compact and simple devices that helps maintain the organization of your keys. It remains comfortable, but the most important factor is that it is quiet (so say goodbye to the irritating noise).
In general, a key organizer such as this one brings many conveniences, but you might have questions when assembling it, especially when you are a complete beginner. However, this guide might give you solutions to the issue, and you will soon realize it is an easy and painless process.

Things to note
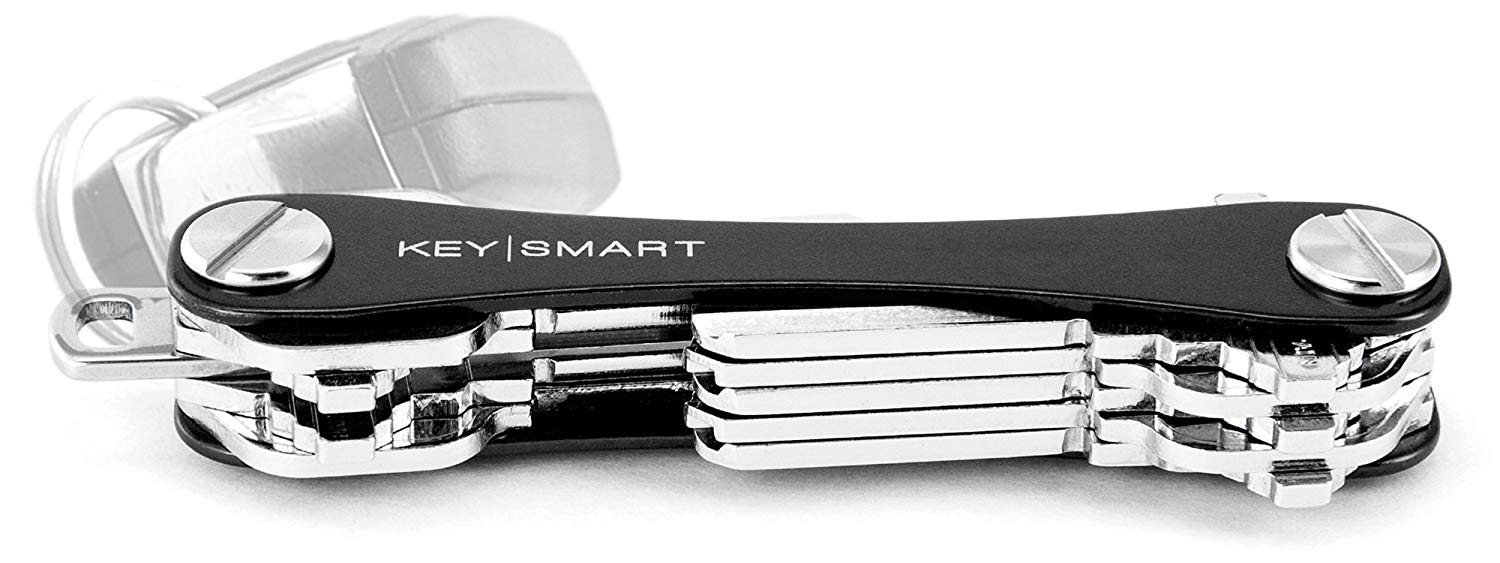
Generally, key organizers will come unassembled when you buy them, but the setup is similar regardless of the specific brand you are dealing with. It includes two screws to hold the entire setup, as well as two flat plates. One of the plates has a set of thread grommets, and you will connect the two posts using the screws to secure the plates together.
The arrangement of the keys is in a certain orientation, and you are supposed to stack them together in this method. The aim is to point the notch edges of the keys towards the inside of the key organizer. You are also to slide a plate on one of the posts to act as an attachment point for your existing keyring.
Also, you will notice that the screws allow you to add pressure on them or reduce it, so that the keys will remain in place after you finish assembling them. You can even do this using a small coin.
Steps
- Start by placing the front plate down, and the logo should be down. The posts, on the other hand, should remain facing up.
- You can slowly begin adding your keys or tools (if you are into EDC equipment), but make sure the keys are facing inwards. If you want to, you can include the use of spacers to make sure the keys remain separate from each other.
- When assembling, you need to ensure the sides of the keys stay completely flush to the post’s top. If you need to, you can use the spacers for greater accuracy. This will also make it easier to add the screws later.
- You can then add the screws and back plate – either through a coin, or by hand.
- Once you are done, fold the keys into the organizer, and it is ready for use.
Conclusion
Assembling a key organizer is not a difficult process, but you may need help when doing it for the first time – the good news is that it is not as difficult as you may imagine.
FAQs
If I have larger accessories or car keys, how do I attach them?
The good news with key organizers is that they will always come with a loop piece, which you can use to attach your car keys or extra tools that cannot fit normally in the setup. In the case of the Keysmart for instance, you can also purchase the Quick Disconnect to help you disconnect the car keys and Keysmart organizer.
Will all keys be compatible?
The good news is that most keys are compatible with these key organizers, as long as the key hole is more than four mm in its diameter, the length a maximum of 67mm, and the profile is flat. In addition, it does not matter what shape the key takes. If you have another type of key that does not fit the criteria, like bicycle lock keys, key fobs, and car keys, you can use the D-ring to attach them to the system.
What are the precautions to take?
Note that the process of setting up the entire system does require some play. If you tighten this area too little during assembly, the key ring loop will swivel on its own and you lose risking your keys. If it is too tight, then orienting the keys will become an awkward process, which means you cannot deploy the keys effectively.