
When it comes to installing new locks, you want the best for the sake of your home security, but sometimes that might prove a challenge when you are unsure of where to begin. Read our step-by-step process of Nest x Yale lock
installation guide.
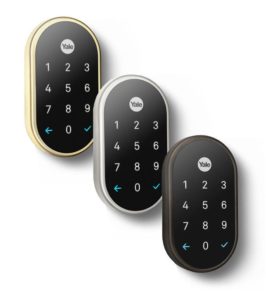
Nest x Yale locks are among the best locks youcan find on the market because of their high efficiency and durability. However, they can be quite the challenge when it comes to installing them – especially when you are a complete beginner in the game, and unsure of what to do.
Basic points to note
The most important thing to remember with installation of any lock generally, is the alignment of all the parts in question. In addition, you will also need to calibrate and test the lock after you install it.
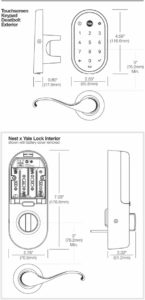
While many Nest x Yale locks can fit well as long as your door is of standard size, the door itself must fit specific requirements. These are:
- A lock hole center that is 2.67 to 2.75 inches away from the door edge
- The door thickness should be 1.67 inches, 1.75 inches or 2 to 2.25 inches.
The process
Preparations
Before installing it, you need to make sure you have not installed the batteries before you are supposed to. Otherwise, the lock will fail to calibrate properly.Follow all the instructions, or else the lock will jam. It is also good to have your old lock close by, just in case the new lock does not work for you.
You do not need a plethora of materials to carry out the process. Aside from the lock parts, the basic materials you should have are:
- A power drill with Phillips bit or a Phillips screwdriver
- A compatible tablet or phone (for the Nest App)
- Strong Wi-Fi network and its password
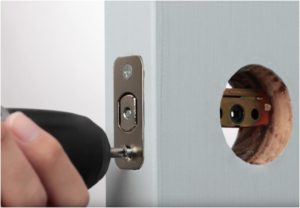
Removing your old lock
If the door does not fit the requirements for proper installation of the lock, then use the drill to reposition the holes. Make sure to follow the guidelines from the instruction manual when carrying this out. In addition, you might also require a chisel, which helps shift the latch plate cutout.
Installation
- Before putting the new lock on the door, make sure to check the adjustments to the lock length so that you are certain it fits, while also ensuring it stays retracted.
- If it fits, you can press the bolt into the door to fit it inside, then use two screws in the package to secure it.
- For the case of the strike plate, you must install the new one that comes with the package, regardless of whether it looks like the old one or not. Otherwise, the lock will have jamming issues.
- Remove the strike plate currently in use, then install the new one in the frame. Ensure that it aligns perfectly with the bolt of your lock before installation, or use a chisel to cutout the plate if it does not.
- The screws you use will depend on what you want – short ones for easy installation, and long ones for security.
- Check whether the latch hole is perfectly horizontal and the deadbolt is retracted completely, as you are now installing the keypad.
next…
- Use the lock hole to run the cable through. You can then press the keypad, so that it fits in the hole – if it is correctly done, the keypad should hold in place.
- For the mounting plate, pull it off the lock’s back and remove the battery cover using a thumbtack or the key provided.
- Insert this key in the top hole and press down, and this will remove the cover.
- Run the cable of the lock through the mounting plate hole, then press the plate pins into the deadbolt holes.
- Use bolts that are the correct length to secure the plate, then tighten them.
- Plug the cable into the lock connector, and use a small tab to help with alignment. Ensure the thumb turn is completely vertical.
- Route the cable behind its allocated hooks to keep it in place.
- Through the hole, guide the spindle, and then hook the lock to the mount plate bottom. Press the lock and it will snap in place.
- Screw the lock into the plate using the small black bolts. Their holes are in the battery compartment.
Conclusion
Installation of the lock itself is easy, but you need to follow the instructions strictly. Fortunately, there are plenty of guides on the internet and user manuals that you can look into in case you want to install it yourself and get stuck along the way.
FAQs
Do I require Nest Guard or Connect on the lock?
You also need to remember that the lock system will need you to first add a Nest Guard or Connect to the app – otherwise, it will not connect with the system and monitoring method on your phone. The good news is – the app is easy to set up, and should not give you too many issues.
Will I need anything else to control the lock remotely?
You will not require other things, as Nest Connect is included in the box.
Can I use my old strike plate if it has a similar design?
No, since you want to prevent instances of the lock jamming, and the new strike plate has a design that fits the lock perfectly.
What setting should I use on my drill?
In order to prevent damage to the screw threads, make sure to use a low torque setting.
How long is the battery life?
The lock uses AA batteries (a set of four), which can last up to a year with normal use. However, it will send you warnings when they are about to run out.